
While installing QuickBooks updates, did you ever receive a message “Error 1606: QuickBooks couldn’t access network location”. Well if yes, then need not to worry anymore, as today through this post we will be dealing with this error, and will also discuss the causes of the same. According to the experts, QuickBooks error code 1606 shows that QuickBooks is unable to find or access a network location during the installation of QuickBooks, or the Windows current user account has been damaged. Sometimes, this error also occurs at the time when QuickBooks can't access the network location that is linked to Windows user folders (like documents, desktop or AppData). You may see the following error message on your desktop screen:
| Warning | Error 1606: Could not access network location |
There can be a variety of factors causing this error, which we will be discussing later in this article. So, make sure that you read the article carefully till the end. You can also get in touch with our support team, in case you feel that the error is too typical for you to handle. Give us a call right away and leave the rest to our experts and certified QuickBooks ProAdvisors.
What are the triggers to QuickBooks error 1606?
As we said before there can be a couple of causes behind the QuickBooks error code 1606 out of which, we have tried to cover some of the common ones below:
- In case your profile on Windows system has been corrupted.
- When the installation of QuickBooks has not been completed due to a corrupt setup file.
- If the Windows registry is damaged or corrupted.
- Any Damaged Microsoft components are there.
- Another situation when such error might appear can be if the windows installer is failed to access the data from QB installation disk.
Solutions to Fix QuickBooks Error 1606 (Could Not Access Network Location)
Below are some of the most effective methods that can be implemented by users to fix the QuickBooks error code 1606. Let us check out each of the methods one by one:
Method 1: Repair Windows Registry Settings
Editing the Windows registry incorrectly may create serious system issues. We recommend you to create a backup before making changes.
- Open your system and press the Windows + R keys together.
- Then type regedit command on the run box.
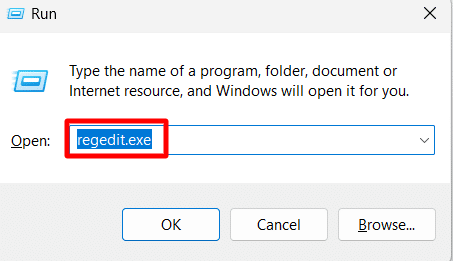
- Hit a click on OK or press the Enter key.
- Then verify the folder paths - HKEY_CURRENT_USER\Software\Microsoft\Windows\CurrentVersion\Explorer\User Shell Folders
- Make sure that the paths are pointing to valid locations.
- Next step is to modify the Incorrect Registry Values.
- Last step is to restart the QuickBooks and retry the QuickBooks installation again.
Method 2: Downloading and installing QuickBooks using admin credentials
The first method can be to download and install QuickBooks using admin credentials. This can be done by carrying out the steps below:
- Initially reboot your system and then sign into the account by using the Windows admin username and password.
- Then locate the QuickBooks setup file and hit a right click on the installer.
- Now select Run as Administrator option.
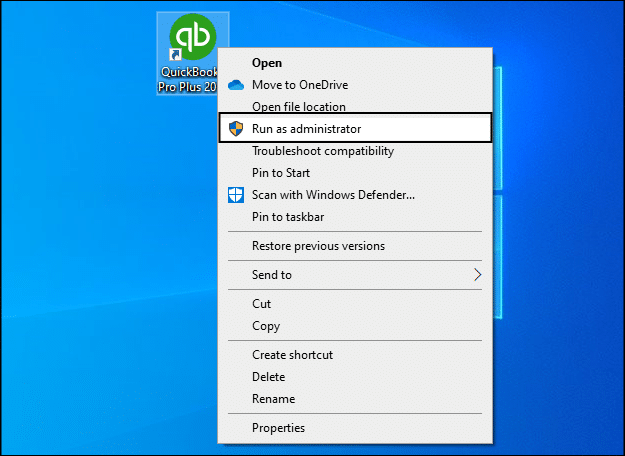
- You need to follow the installation instructions carefully.
After that install and run QuickBooks to see if error 1606 is resolved or not.
Method 3: Installing QuickBooks again in Windows safe mode
It is recommended to start your Windows in Safe mode and then attempt to install QuickBooks.
- Restart the computer and press the F8 key repeatedly on the bootup screen.
- From the Advanced boot options list, select Safe Mode with Networking option and hit on Enter key.
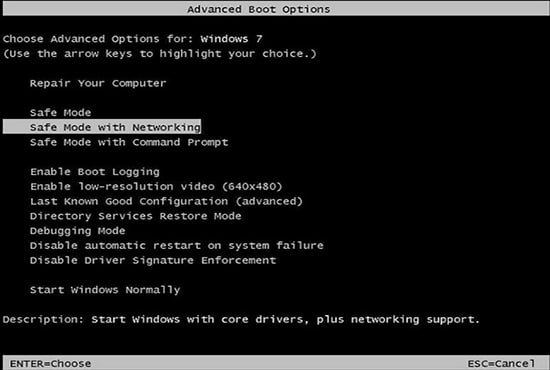
- Now install QuickBooks via the setup file.
Method 4: Installing QuickBooks via new Windows admin user
You need to create a new user account on Windows with admin privileges. You are also needed to reboot the Windows and sign in to the recent account.
Windows 11:
For Windows 11 users, the procedure to create a new Admin user is given below:
- Select Windows start and Settings.
- In the accounts section, select Family and other users.
- Choose the Add someone else on this system option.

- Select I don’t have this person’s sign in information and then hit a click on Add a user without Microsoft account.
- Now type the User name and the password.
- Hit a click on Finish and also select Account.
- Last step is to select Admin from the account type section and then hit OK key.
Windows 7 and 8:
The steps for Windows 7 and Windows 8 users are discussed as under:
- Press the Windows start button.
- In the search programs box, enter User accounts.
- Also select User accounts, before that select Manage account.
- Now assign a name to the New account and select Admin and click on Details.
- Finally install and launch the QuickBooks software.
Method 5: Download the QuickBooks installation file
At times, the CD drive fails to run the data on the CD as a consequence of scratches on the installation disc. This makes it necessary for you to download the setup file from the QuickBooks product download page.
Method 6: Installing the QuickBooks in selective startup
If none of the above-mentioned methods work out, then try logging in in the selective startup mode. Once that is done, again try installing QuickBooks.
- In this particular method, first press the Win + R keys on the keyboard to open Run command.
- And then type Msconfig and then select OK tab.

- Move to the General tab and select the Selective startup option, followed by Load system services.

- In the services tab, and then choose the Hide all Microsoft services option.
- And then, opt for Disable all icon.

- Now unmark the Hide all Microsoft services checkbox.
- And also verify the services list, and ensure that the Windows installer checkbox is selected. In case not, then mark it.
- Also select the Ok icon.
- The final step is to move to the system configuration window and click on Restart tab.
Method 7: Fixing any wrong registry subkey

The process is supposed to be followed by system admin. This process includes editing the registry, which, if not done correctly, could result in serious damage to the device.
Method 8: In case you are running QuickBooks desktop in Windows 7 installed in Parallels
- Log out of your parallel and then log in again.
- In the parallel Desktop, choose Devices and then click Shared Folders.
- Now select Disconnect All (you will be logged out of the parallel).
- Lastly sign-in and install QuickBooks desktop.
Final Words....!
We have tried to summarize some of the best possible solutions to the QuickBooks error code 1606 in this article. And we hope that after scrolling through the same, you might be able to get rid of this error successfully. But if by any chance, if you are unable to do so, then you need not to be worry, as our QuickBooks enterprise customer support team will be there to help you out. All you have to do is ring to us at 1-800-761-1787 and leave the rest to us.
FAQs
What is the error message associated with QuickBooks Error 1606?
The error notification that shows up in association with Error 1606 is "Error 1606: Could not access network location."
How can I prevent Error Code 1606 in the future?
Follow the directions given below:
1. The QuickBooks installation should be allowed to complete without any interruption, and the system requirements should be checked first.
2. QuickBooks should be updated frequently.
3. A seamless network connection is mandatory to prevent any network issues.
What should I do if the network location mentioned in the error message does not exist?
1. Revert to a previous backup.
2. Remove any remnants of the previous installation.
Other articles to read:
Steps to Fix QuickBooks Error 2147221164: Class not Registered


