Have you recently purchased a fresh copy of QuickBooks desktop software and are seeking a quick way to install it? Well, there is no need to go anywhere as this article contains all the necessary steps to help you in the process of installing the QuickBooks on your system. For some users who has never used QuickBooks desktop, it might seem as a tough task when it comes to download, install and setup QuickBooks desktop on their system. An incomplete or improper installation can lead to activation, update, company file related problems or performance related issues later on. But the good news is that downloading and installing QuickBooks desktop is not that difficult as it may seem.
Thus with the help of this article, we are going to share all the necessary steps to install QuickBooks desktop by you own. Make sure to read this article post carefully till the end. However, there is an option for you to get in touch with our QuickBooks support team and get answers to all your queries instantly.
You may also read: Steps to set up landed cost in QuickBooks Enterprise Services
Important things to keep ready before Installing QuickBooks
Before starting the installation process, you are required the following things available:
- Must have QuickBooks License number and Product Code.
- A stable Internet connection
- Windows Administrator Credentials (You should login as System admin)
- QuickBooks desktop installation file.
Important: You can find your license number and product code in behind the product packing or in the email you have provided at the time of purchasing the software.
Check QuickBooks Desktop System Requirements
In order to install the QuickBooks Desktop you need to make sure about the minimum system requirements of your computer. Check the system requirements first to run your software smoothly in your system:

Steps to Install QuickBooks Desktop for the First Time
Below are the detailed explanation for Installing the QuickBooks desktop on your computer. These steps are supposed to be followed only after you have pre downloaded all the necessary files related to QuickBooks. So, let’s get started:
Step 1: Download QuickBooks Desktop
Follow these steps to download the latest version of QuickBooks desktop:
- Download the appropriate installation file for the product and then jump onto the next step.
- Visit Downloads & updates page to get the download link for the version of QuickBooks purchased earlier.
- The ProAdvisors need to log in to the QuickBooks ProAdvisor Center to download the software.
- Whereas, the accountants are supposed to log into CAMPS to download the software.
In order to download the installation file, the steps to be followed are as follows:
Download QuickBooks for Intuit website
- Pick the Country, product, and version from the Downloads and updates page. If you are unaware of the version you are currently using, read the related article.

- Hit a click on the Download option.
- Save the installation file in an easily accessible location.
Download QuickBooks via CD
- Eject the CD drive and place the QuickBooks software CD into it.
- After the CD has been inserted, then the QuickBooks installer will automatically open up.
- A dialog box will appear on the screen with a Start tab, and then right click on it and select the Explorer tab.
- Move to the Folder list in the explorer screen and select QuickBooks CD.
- Launch the QuickBooks installer, and hit the Setup.exe file.
Step 2: Prepare the system for Installation
- Ensure that the device you are going to Install QuickBooks Desktop on meets all the System requirements.
- Make sure you have the Product key and License number details.

Need assistance in spotting the product and license number?
- In case you have bought QuickBooks directly from the website, you can spot the info in the original purchase email.
- If you have purchased it from a retail store, then you are required to look for the label in the original package.
- If you are reinstalling it, you can look for the information from the customer account management portal.
- In case you have lost the license or product number, then you can take assistance from a professional.
Similar Article: How to Use QuickBooks auto data recovery (ADR) tool?
Step 3: Run the QuickBooks Desktop Installation
- Open the folder where the download file was saved and search for QuickBooks.exe file.
- Double click on the file and follow the on-screen instructions.
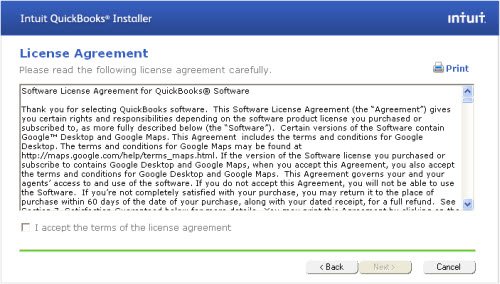
- Read the Software license agreement and select I Accept the Terms in the License Agreement option.
- Hit a click on the Next button.
- Now Enter the Product key and License number as per your software purchase. Follow it by clicking on Next.

Step 4: Choose the Installation type
There are 2 Installation options from which you will have to choose the one which fits your needs perfectly. Following are the options and the functions that they are useful for:
1. Express Installation
This method of installation is suitable for users that are:
- First time users of QuickBooks desktop.
- Users who are reinstalling QuickBooks.
- Users who are going to use the software on just this computer and will not be a part of any network.
Installation method
- Hit a click on Express option and then follow it by clicking on Next tab.
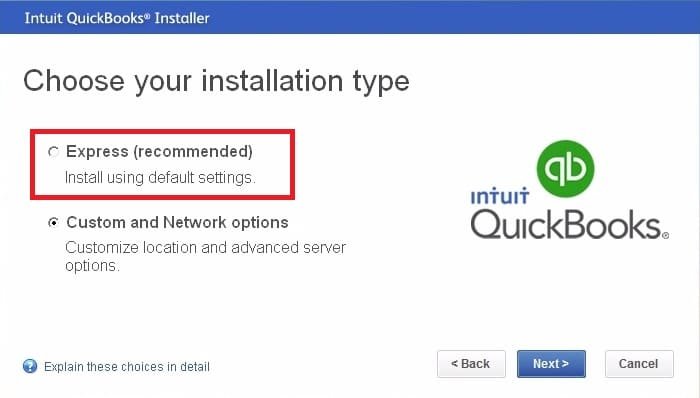
- Now select Install.
- Once the installation is finished, select Open QuickBooks to get started.
2. Custom and Network Install
This method of Installation is suitable for users belonging to the following category:
- Hosting company file on a server
- Users who are Setting up a multi-user network
- Users who are Installing QB Desktop on a server rather than the respective device
Installation method:
- Select the Custom and Network Option and follow it by clicking on Next button.

- Now select the Option that describes the best usage of QuickBooks as per your preference.

- On this screen, choose the Change the Install Location option.
- Hit a click on Browse to select the folder where you want to put your QuickBooks files.

- Hit a click on Next tab which will initiate the Installation.
- Once done, select Open QuickBooks to get started.

The installation process may some time depending on your system specifications.
Read this also: How to Create and Open Portable Company Files in QuickBooks Desktop?
Step 5: Activate your QuickBooks Desktop
Once you have successfully installed QuickBooks desktop, you should activate it before getting started. QuickBooks will prompt you to activate, but you can also activate it manually with these steps.
- Open QuickBooks desktop and press the F2 key on the keyboard.
- From the Help menu, choose Activate QuickBooks desktop option.
- Open the product information window and then verify the registration status and the license number.
- In case the status is showing Activated, then you are set.
- If the status shows not activated, then select OK tab to close the Product information window.
- And then move to the Help menu and select Activate QuickBooks tab.

- Now Update the software and active in case the process is required.
- Simply download or update the latest version of QuickBooks desktop to complete the activation process.
Final Words..!
Once you successfully complete all the steps mentioned above, you will be able to use QuickBooks desktop on your device. It is important for you to make sure that you follow the steps in an orderly fashion to ensure that the installation process does not crash mid-way. In any case, you are facing any problem or any error regarding the installation of QuickBooks desktop even after following these steps in the right order, then you can contact our 24/7 QuickBooks error support team at 1-800-761-1787. We will provide you with complete assistance regarding whatever issue you are facing.
FAQ’s
What is QuickBooks Desktop?
Accounting tools are the spine of any organization nowadays, as they offer great aid and freedom in terms of managing the data. QuickBooks Desktop is one of the most popular accounting software that offers a cloud-based subscription service. This means you can access the entire database from anywhere and anytime without any hassle whatsoever. The best part of QuickBooks is that it is a one-time purchase software, which makes it highly productive and a great return on investment.
What are the latest features offered by QuickBooks desktop 2024?
The latest QuickBooks desktop offers some great features, which include the following:
Cash toggle on reports: This feature allows you to toggle displayed reports between cash or accrual basis.
Search chart of accounts: This new feature allows you to find and choose a chart of account or sub-account by typing an account number and the account name or partial words of an account name.
Updated email security: QuickBooks desktop now includes securely sending emails from Gmail, Outlook, and Windows Live accounts through QuickBooks, using improved multi-factor authentication. Security here includes signing in with the Intuit ID account. Once you set it up, you don't need to enter your webmail password again when emailing from within QuickBooks.
Inventory report customization: Inventory reports like the Inventory valuation summary or detail, Inventory stock status by item, and assembly shortage by item have an option to customize display.
Sales order fulfillment workflow: You get an access to picklist details on a mobile device that is connected wirelessly to a QuickBooks Enterprise file with advanced inventory. Moreover, with this software you get real time access to the status of sales order fulfillment in QuickBooks enterprise.
Mobile inventory scanning: You can now pick quantities at the warehouse using a barcode on a device or Android phone to record inventory.
Multi monitor support: Another new feature added here is multi-monitor support, using which you can connect up to three monitors from the menu bar in QuickBooks. Move to view and choose the multi-monitor mode.
Payroll liability and payment reminder: This particular feature of QuickBooks desktop ascertain that you and your clients reminded of upcoming payroll liabilities payments.
Past due stamps on QuickBooks: This feature gives a visual confirmation that a customer's invoice is past due displays on the screen when an invoice has a past due balance.
Merge vendor record: This particular feature provides a consolidated window to identify and combine duplicated vendor records efficiently.
Other helpful articles:
Steps to take a backup of your QuickBooks company files
How to Troubleshoot the QuickBooks Banking Error 324?
Latest methods to remove QuickBooks error 30114
Fixing the QuickBooks Error 1911: Could Not Register Type Library for File